Friday 30 December 2011

Applying a Liquid Damp Proof Membrane to my subfloor, What are the Benefits?

Hello and welcome to another Woodfloor-Renovations Blog Post.

Today I'll expand on a question we were recently asked verbally by one of our clients while carrying out works for him....The question was 'What are the benefits of applying a liquid damp proof membrane to my subfloor ?'

Many people out there will have no idea what a liquid damp proof membrane is [liquid DPM for short] or what it does.

A liquid DPM is basically liquid plastic, a different variation on the thick plastic sheets that builders use under a concrete slab to inhibit/stop moisture from wicking up into the concrete slab from the cold earth below.

Many companies out there produce similar types of liquid DPM products that are good for applying to various types of substrates [subfloors] a very common subfloor that a liquid DPM is used on is concrete.

We use liquid DPM's from two well know companies, and use their excellent products on a regular 'as and when basis' one of the companies is called Sika and we use both their 'Sika Rapid' liquid DPM and their star product 'Sika MB'

The other company we source our liquid DPM from is 'Lecol' and we use their superb single component Lecol PU280 liquid DPM.

The main benefit of using a liquid DPM product would be to stop moisture ingress into a  wooden floor and creating problems and issues for the newly installed wood floor and the homeowner. Using a liquid DPM system is cost effective as it is pretty straight forward to apply and it's application will add another layer of protection and peace of mind for the end user. 

Before I start getting too carried away here and churning out paragraphs of text, I wrote a more comprehensive article which is available for viewing at our main website, follow the  Liquid Damp Proof Membrane link.

Hope this helps.....Thanks for reading


Thursday 8 December 2011

Flooring Lacquer Complaints

Hello and welcome to another Woodfloor-Renovations Blogpost.


Apologies for my poor output of late, but we have been extremely busy in the run up to Christmas...there just isn't enough hours in the day.


I've received some correspondence of late, where end users are making complaints about the flooring lacquers that they themselves have applied and are unhappy with the results, and because it obviously can't be their fault [the end users]...it must be the lacquer !!!!


What many end users just don't do, is to properly read through and understand the manufacturers instructions on how to apply the lacquer, one of the complaints I received was from a gentleman in the UK, who has prepared his parquet floor and applied the lacquer himself, in this case a Silk Matt finish.


The complaint was basically that the finish on the floor didn't look consistant and that it looked shiny at one end of the room and silk at the other...In my book this is a classic case of the lacquer not being shaken properly prior to being used.


Wood flooring lacquers are made up of many different components, and they need to be properly mixed together before being used, if the can of lacquer isn't shaken then the different components settle at the bottom of the can, and when you pour the product onto the floor to apply it, its just not mixed properly and the chances are the first part of your floor will look glossy, as the matting agents [some of the many components] are at the bottom of the can, unmixed...Its not rocket science is it.


As I have mentioned many times on this blog, read, understand and follow all the manufacturers instructions and you will have a pretty good chance of a successful outcome for your project...ignore or disregard the advice at your peril.


Another issue that was emailed in was from a lady who was asking if it was 'really necessary' to add the hardener into a high traffic lacquer.....the answer is a resounding YES IT IS...its a 2 component lacquer for a reason, you pour part B into part A, give it a shake up for 2 minutes and you are good to go...Now if you DON'T pour part B into part A and use the product, your floor will be good for nothing as it just won't go off without the hardener mixed in...You have been warned... :-)


Thanks for reading...Regards Gary


Checkout the Woodfloor Renovations Website

Sunday 13 November 2011

Waxed Parquet Block Floor is Sticky and Picks Up Dirt

Hello and Welcome to another Woodfloor-Renovations Blog Post.


Today I'll show you a couple of pictures from a recent Floor Sanding job of ours and explain a few things that many end users often do and wonder why what they have done looks rubbish and doesn't last.


Our client had previously done the floor sanding and sealing works herself, with poor results, and was asking many questions with regards to sanding/finishing/products etc.etc.


When she had last sanded/sealed the floor, [only 12 months ago] which is an original Pine Parquet Wood block floor, fitted in the diagonal herringbone pattern with no border approximately 90 years old, the area was, to cut a long story short, basically sanded and waxed, which had unquestionably been applied too thickly by our client, [a common DIY mistake] which was the reason the floor looked blotchy, felt sticky all the time, was difficult/impossible to clean and attracted dirt like bee's to a honeypot...[picture below] 


This picture [above] was taken about 30 minutes or so after we started sanding the floor, and you can clearly see the high traffic area's in the middle of the picture which were basically bare wood as the old seal had completely worn through.

The picture below is the floor in its finished condition, immediately after the 3rd coat of lacquer had been applied to this floor.

 Our client had specified a high traffic lacquered finish for this project, and in this case we applied 1 x coat of a solvent based primer to seal in any wax residues and negate any contamination of the new lacquered finish, this was then followed by 2 coats of Lobadur WS 2K Fusion which is a high performance 2 part lacquer, famed for its durability, which looked superb and will serve our client well for many a long day.


Looks a bit different from the first picture doesn't it !

Thanks for reading...Regards Gary


Monday 7 November 2011

Parquet Block Floor Sanding Wirral


This is a Brown Teak parquet block floor in its finished condition, much to my shame we never took a picture or Video of the floor/room in its pre-sand condition.

In my rather flimsy defence, we did have a fair bit of work to do before we even started sanding the floor, as 75% of the first row of border blocks around the perimeter of the room were loose, this was caused by the client removing the gripper rods...it happens a lot.

So we had to clean the blocks off and re-adhere them all back into position before we could start with the sanding works...well thats my excuse for forgetting to take a 'before' picture, and i'm sticking to it.

Rest assured the floor was looking much the worse for wear and really did need the full sand and seal treatment, which we of course gave it.

Kind thanks to our client Annabel for her kind hospitality over the course of a long day.

Sunday 30 October 2011

Cheshire Parquet Block Floor Repair and Renovation


This Parquet flooring repair and restoration is now completed and doesn't the floor look good, the original Oak parquet floor is now fully repaired and sanded and sealed and is now ready for many years of service for our clients.

Thanks for viewing.

Check out the main Woodfloor-Renovations Website

Parquet Flooring Repair and Restoration Cheshire


Another Woodfloor-Renovations Parquet Floor Restoration project, this one was in Cuddington, Cheshire.

In this video clip you can see the areas of blocks which we have just repaired [with the white masking tape on] and the other voided area which we were about to repair.

Check back to see the second video where you can see the completed project.

Thanks for viewing. 

Sunday 23 October 2011

My Wood Floor Looks Orange.....Why ?????

Hello and welcome to another Woodfloor-Renovations blog post.


Today we'll talk about another question i've been asked many times, the [full] question is:- "I've got a Maple Strip Wood Floor and it looks almost Orange ? It was only sanded and finished 3 years ago...Do you know why my floor has gone that colour ?? "


I've seen countless wood floors that have turned orange in colour, usually only a couple of years after the floor has been refinished, the culprit is merciless in that it doesn't care what the species is, or whether the floor is Parquet Block or Strip Flooring, the end result will always be the same...in that the floor turns Orange in colour.


The guilty party is almost certainly a floor seal called 'Bourneseal' this product was used very widely in the floor sanding industry for many years as a flooring lacquer, and is still available today, but is no-where near as popular with flooring contractors as it once was.


I don't know the technical details as to why Bourneseal turns wooden floors an orangey colour, the lady who sent in the question mentioned that the floor seal had looked clear for at least two years and then started to slowly turn orange during the third year.


If you want the floor to look clear again i'm afraid the only thing you can do is to have it fully Sanded off and Re-Sealed, as far as i know there is no other way, but if you do have the floor fully sanded make sure your contractor uses a modern non yellowing seal from a reputable manufacturer such as Bona, Junckers or Lobadur...


There are many other Lacquers out there from excellent manufacturers, which will do the job very well, but as I use lacquers very regularly from Junckers, Lobadur [lecol here in the UK] and Bona, I know these products work extremely well and WILL NOT even go yellow, never mind orange.


Hope that helps, thanks for reading.


Regards Gary


Thursday 6 October 2011

Dust Free Wood Floor Sanding...How Dust Free is it ?

Hello and Welcome to another Woodfloor-Renovations Blog Post


Today the question I've been asked is a very common one, but is of great concern to every person who asks....The question is "Is Dust Free Floorsanding really dust free ??"


The very short answer to this is...No, its not 100% dust free.


No-one out there in the big wide world of floor sanding can honestly claim to provide a completely 100% dust free floorsanding service...But...you can claim to provide a 95% dust free service.


I believe there is actually a European Parliamentary Directive that seeks to prohibit companies in Europe from claiming to offer a 100% dust free floorsanding service, well that's what I heard in Nov 2008 at the UK Bona headquarters in Milton Keynes... 


For many people out there who have hired a floor sanding machine and sanded their own wood floors using hire shop equipment, the concept of a virtually dust free experience would seem like something of a far fetched fairy story, I myself have seen these hire shop machines in action, spewing out dust at a quite unbelievable rate, quickly filling even large rooms with never ending amounts of wood dust.


I hasten to add to have only seen the machines working, I have never used one of these lower quality sanding machines [and I never will]


At Woodfloor-Renovations we use Bona floor sanding machinery, its high end professional floor sanding kit that genuinely does collect 95% + of the dust particulates created during the floor sanding process. The remaining few percent is easily Vacuumed up, and right at the very end of all the sanding/vacuuming processes, we always tack cloth the entire floor to leave the area as dust free as possible.


It really is possible to have a virtually dust free floor sanding process, but you will need to use professional quality equipment to make the virtually dust free scenario a reality, and most importantly vacuum the floor frequently during the floor-sanding processes. 


Hope that helps...Thanks for reading.

Saturday 1 October 2011

Sanding Wooden Floors-How Long Before You Know What You Are Doing ?

Hello and Welcome to another Woodfloor-Renovations Blog Post


Today's post is a recently received question from a Mr Keen,
who ask's " I'm thinking of Sanding Wood Floors for a living, in your experience how long is it before you know what you are doing ??


Well Mr. Keen, in my experience, and I'll be brutally honest with you, it was a full 9 months before I felt fully in control of the jobs/projects I was working on. In the Wood Floor Sanding world you come across many, many things of which are out of your control, but at the same time you have to deal with these issues and do the best you can with any given situation.


As an example of the multitude of variables a professional floor sander has to encounter, I'll briefly describe an issue we had to deal with some months back at a school which we regularly do renovation works.


The area was a long corridor, original parquet blocks [Oak] the floor had been sanded off, and at the end of the second day we applied the first coat of seal [Junckers Baseprime] we left the premises and went home after this coat had been applied, the weather when we left was bright and sunny.


When we came back to the job the next morning there was a puddle of water near to a window, unfortunately overnight there had been very heavy rains and unbeknown to anyone at the school, the window developed a bad leak, the water had stained an area of the floor, and seeing as we were about to put on 3 Coats of Junckers HP Sport commercial lacquer, something had to be done.


We basically sanded off the effected area and re-applied the Baseprime, then continued to apply the finishing coats of lacquer, in short you will come across a multitude of different types of issues and difficult situations, very often when you are half way [and more] through a project...Experience is the key to high quality floor sanding, it's the experience that can't be bought, only gained by doing job after job to a high standard.


If you are serious about getting into the industry, I would recommend you try and obtain work in your part of the world with a reputable company as an assistant, learning the trade properly from the ground up, it's not an easy job and is very hard work, and you must bear in mind there is a huge amount to learn, from using the machinery correctly, to applying seals, oils, lacquers, stains etc.etc...the list goes on and on.


Before taking the plunge into the deep end, one major thing I would advocate would be to do an industry recognised training course, which will give you a basic grounding and show you how to correctly use the equipment, apply seals and oils the correct way.

Having a qualification is nice after doing two days training, but it doesn't mean you know what you are doing, or in the harsh world of floor sanding are properly qualified...It means you are moderately proficient after doing 2 days training...Knowledge and know-how take time and experience, if you are dedicated to the craft you have a good chance.


Whichever way you go I hope it goes well for you.


Hope that helps - Thanks for reading

Monday 26 September 2011

Flooring Lacquer Application....Shall I Use a Roller or T Bar Applicator

Hello and Welcome to another Woodfloor-Renovations Blog Post


Today I'll try and advise on an issue that can effect if the final touches to your hard work will look any good or not...Yes its the contentious issue of Lacquer application...Do you use a standard Roller...or a more professional 'T' Bar applicator. 


When I first started floor sanding, I was shown by a very experienced floor sanding operator how to use a 'T' Bar applicator, and boy did he make it look easy, in the hands of an experienced pro it looks simplicity itself to put lacquer down correctly...Pahhhhh I thought, what's all the fuss about, its easy - I can do that.


Now I can do it easily, but it took many months before I became accomplished with the Padco Bigfoot, its nowhere near as easy as it looks.


The image on the left is the Padco Bigfoot floor lacquer applicator, the operator is applying lacquer, likely to a large area. The Padco Bigfoot and applicators of its type are just superb for putting lacquer down to large area's, I myself have used this applicator scores of times with nothing but a top class result, in the hands of a professional its possible to get a near flawless finish to large area's pretty quickly.


However, I really wouldn't recommend this applicator for the very occasional DIYer, who is just using it for one or two rooms. The Padco is not at its best in small area's, for a professional its straightforward, but for the inexperienced user this tool will be difficult to use properly, to obtain a high quality of finish to your project.


For an end user who hasn't much [or no] experience I would highly recommend using a roller for applying the lacquers to your wood floor. Once you have the floor correctly prepared and readied, use a 4" foam roller to cut in, and either a 9" or 12" roller and cage for the main lacquer application duties.


The image on the right is a 9" roller and is obviously being used to correctly apply a lacquer product to a wooden floor, in this case a mosaic parquet. For just about all the Sand & Seal jobs I do these days I tend to use a roller, as I find the overall finish that you get, especially in smaller areas is just much better than using a Padco Bigfoot.


We tend to use either a 15" or 18" version of the image to the right. Whichever size roller you use make sure that the pile length is around the 8mm mark, this is pretty much the optimum roller sleeve pile length for applying lacquer to a wooden floor, if the pile is say 13mm, the roller has a tendency to 'splatter' the lacquer over the surface and it just takes a lot longer to apply the product [lacquer] correctly to the floor.


If you use a short pile length roller of around 5mm the roller tends to flood easily and again it takes alot longer to apply the lacquer correctly, many manufacturers supply and recommend their own rollers and roller sleeves, if you are not confident about sourcing the correct roller/sleeve products then I would heartily recommend purchasing the manufacturers own branded roller/sleeve as you are much more likely to get a better finish, especially if you do your homework in the first place, most manufacturers have this type of information on their respective websites.


Plus there is You Tube, which is a veritable gold mine of information on this subject. Type in 'apply bona mega' as an example and you will quickly find dozens of videos showing how to apply flooring lacquer.


Hope that helps, Thanks for reading.


I have recently received an email from JD Floors asking for some advice on how to fix an Alto Floorcrafter, which is cutting too hard to the left, Unfortunately I have no experience whatsoever of this machine, but I did do a quick Google search and it looks a quality piece of kit.


 I myself use Bona floor sanding machinery, Bona have an excellent instructional video which may be of help, as most professional floor sanding machines are built to very similar principles so the clip may just be of use, follow the link below.


Bona Instructional Video 


Saturday 24 September 2011

Parquet Wood Block Flooring Repairs To an Old Hearth Area

Hello again and welcome to another Woodfloor-Renovations Blog Post.


Today's wise words are not from anyone sending in questions or asking for professional advice, but are initiated from a recently completed project.


The project was relatively small in size, but the parquet block repairs we carried out to the voided fireplace/hearth area made a huge aesthetic difference to the room, and most importantly made our client very happy indeed.

In my experience there are two main ways to in-fill a voided hearth area with parquet blocks, the easiest and somewhat quicker method would be to do the in-fill with what I personally call 'soldier fashion' this method involves properly preparing the sub-floor and then laying the blocks in soldier like rows and using the correct parquet adhesive to fix the parquet blocks into position. [see picture below]


Parquet Block Flooring Repair

The other method I use is a one I call the 'Tied In' method, Its certainly more work and is considerably more time consuming than the 'Soldier Fashion' method, but if done properly the repair will barely be noticeable in any room in which it is done.

The DIY enthusiast MUST  bear in mind that when trying to effect the 'Tied In' repair method, it is very important that the replacement blocks that are being used for the repair are as best a match as possible to the block species and even more importantly the block size dimensions.

I can hear you saying...'what difference will a few millimetres make??'

The answer is an awful lot of gap filling and more work for the end user...trust me I've been there...done that...If you have spare material in your property perhaps in a cupboard or under-stair area it is much better to use material of the same species and dimensions than trying to find reclaimed materials to match.

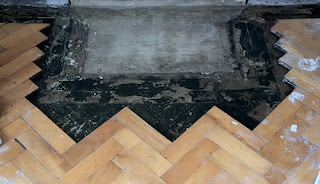
The following pictures are from a project I have completed and shows clearly the difference between the two methods, with the 'Tied In' method there is more initial preparation work, given the fact that you have to remove maybe 2 dozen or more full blocks and many smaller angle cut blocks so the pattern can be tied back in properly.

In the picture below you can see where the old hearth was, and also where the original 2 block border was, I used nearly all these border blocks to infill the voided area.


Beech Paquet Block Repair to Hearth Area


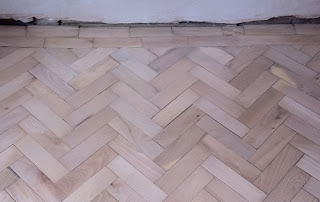
The next picture shows the area after the infill has been done, the area looks a little gappy, but this is nothing to worry about and is completely normal for repairs of this kind. The area was gap filled after the floor sanding had taken place.

Beech Parquet Block Floor Repairs

The room was left for a few days for the repair to fully go off, the whole room was fully sanded off and properly prepared, the repaired area was then gap filled, sanded off again, and the room then sealed and lacquered in this case with Junckers Semi Gloss Lacquer. See the picture below for the repair is done,finished and pictured just before the first coat of seal was applied.

Beech Parquet Floor Repairs in Cheshire

The finished floor in this instance really did look superb and the clients were very hard pressed to find where the repair was...I have uploaded the Gallery pictures of this project to our website, you can view the photo set Here

Thanks for reading...Hope you enjoyed...


Sunday 18 September 2011

Floor Lacquer Systems...What are they?

Hello and welcome to another Woodfloor-Renovations Blog Post


Today I'd like to talk about about a subject that is oft ignored, even by many pro's, today's offering is:
 'Floor Lacquer Systems... What are they ??'


A floor lacquer system is the correct application of the proper primer coat and subsequent coats of either lacquer or oil.


Now dependant on some of the many variables involved with the floor sanding and sealing process, such as floor species, desired finish [sheen level] site conditions, time-frame, etc. etc. [the list is long] certain primers are more suitable than others for certain timbers and certain finishes.


For example, if the end user has properly prepared a Beech strip floor and wants a deep rich natural colourization of the timber, then an Oil based primer may be the ideal primer to use, but using this primer may not be practical if the job needs to be completed in a day as oil based primers have much longer drying times [6-8hrs in some cases]


Now if the same floor HAS to be done in a day then you can use a solvent based primer such as Junckers Baseprime, or Blanchon Fond Du, these types of primers almost give the same kind of depth of colour to the timber but dry in about an hour, so very often, a capable professional can apply 1 x coat of primer and 2 x coats of lacquer in around 3-4 hrs in reasonable site drying conditions.


So you have now applied your primer coat, the wood floor looks great, now's the time to apply the lacquer to finish off the system, for examples sake again lets say this project is a domestic situation and the space is a busy living area belonging to a busy family. If this imaginary project was for one of my clients I would have recommended 1 x Primer Coat followed by 2 x High Traffic Lacquer, or maybe even 3 x High Traffic Lacquer.


With wood floor lacquer systems its about horses for courses, some situations demand a harder wearing finish which will cost a bit more initially, but will be more cost effective in the longer term as it will just wear better than a more standard lacquer finish.


Conversely the clients may have a low traffic environment and not need the high traffic finish, in which case a mid range product such as Bona Mega or Junckers Strong would be eminently suitable. 


In reality its up to the end user to decide whether a 3 coat or 4 coat system best suits their particular needs, if you are in any doubt ask your floor sanding professional.


Hope that helps - Thanks for reading

Friday 16 September 2011

I'm Sanding a Wood Floor Myself, What advice would you give me ??

Hello and welcome to another Woodfloor-Renovations Blog Post.


Firstly I'd like to apologise for the lack of output from myself the last couple of weeks.....we've been pretty busy pushing and pulling the sanding machine and time has been at a premium.


Today I'll expand on a subject that many people try and do, but few do really well, the question [via email] is: "I'm sanding my wood floor myself, what advice would you give me ??"


The wood floor in the picture was sent in by our man asking the question, the species is also unknown to him and is apparently original to the property and looking a bit on the rough side I must say - I would hazard a guess at either Maple or Beech as the species [actual picture below]


This wood floor could be one of half a dozen or more different species, the orange 'glow' will be thanks to a seal called Bourneseal, which was commonly used back in the day - but any wooden floor it touched would end up this orange colour - avoid at all costs.

The worst mistake the average DIY floor sander makes is hiring poor quality sanding machinery, and by that I mean most of the hire shop fleet of HT7 and HT8 machines. These machines have precious little in the way of dust capture and are an absolute country mile away from the standard of Professional floor sanding kit.

If you are serious about doing the best job you can on your wood floors, then hire the better quality machinery which is available at many outlets nationwide [UK] it of course costs a bit more than the standard hire shop fodder but if done properly the results will speak for them selves.

 The minimum machinery level I would suggest you will need are as follows, [IMHO] if your budget can stretch to the professional kit, then try and hire either a Bona 10" Sanding Machine as the main sander, or the Lagler Hummel. 

These two beasts are arguably the best two sanding machines in the business, I personally have used both of them on several large scale projects, and as i run a nearly new Bona 10" sander on a day to day basis I would have to say its the better machine, but its close, the Hummel is a superb bit of kit also and can tackle the hardest of jobs with aplomb.

You will also need a good quality edging machine, both Bona and Lagler have these machines in their respective armoury's, both will do the job really well, if you have multiple rooms I would suggest hiring the 7" version as it is just more powerful and a little bit quicker than its 6" sibling.

Next on the list is the Buffing/Finishing machine, this is used to put the final smoothness to the floor, it is usually the last 2 or 3 processes that put the most quality into the job. Bona have an excellent buffing machine, cunningly called the 'Bona Buffer' its pretty easy to use and does a great job.

Lagler have arguably the best finishing machine in the business, the Trio - this is a superb machine and can put a world class finish on most floors, although Parquet floors are its forte its also tremendous on just about every Hardwood floor out there. The Trio is an expensive piece of kit and is consequently not cheap to hire, but you will get a superbly smooth finish to your wood floor if used correctly.

Many companies here in the UK that hire the professional standard equipment, will hire out the equipment individually or in a package form, where you can hire the relevant equipment that best suits your particular needs, if you tell these companies what type of floor you have, the size of the area and your time-frame and budget, they will give you the best advise they can I'm sure. 

Anyone contemplating sanding a floor themselves must be prepared to do their homework...and then some...Sanding a wood floor properly and getting a professional finish is not easy, and for someone with no experience or know-how the chances of getting a high quality finish on your floors are slim...even with professional kit...but, and its a big but, if you research the subject in depth, take your time and hire the best machinery you can afford you will give yourself a fighting chance.

Hope that helps - thanks for reading.  


Saturday 3 September 2011

How Do I Lay Parquet Flooring Adhesive ?


Hello and welcome to another Woodfloor-Renovations Blog Post.

Today I'll talk a little about a rather sticky subject [excuse the pun] which most people attempting to use professional Parquet Flooring Adhesives for the first time may be in for a bit of a shock.
The question today is "How do I lay parquet flooring adhesive ??"

For the first time amateur DIYer its just not as easy as you think, just about all good quality parquet flooring adhesives are incredibly sticky and have an annoying habit of going everywhere.

ALWAYS use vinyl/plastic gloves because if you don't the glue takes some removing from your hands.

The adhesives we use regularly are Lecol 5500, Laybond L16 and Sika 5500s.

These are all excellent products and all basically do the same thing, which in this case is to properly stick Wooden Parquet Blocks to a subfloor.

We did a comprehensive article on this very subject a few months ago which goes into detail about the products, methods and the tools needed to get the best result possible for your project. Have a look at our Parquet Flooring Repair Tips and Hints page.

Hope this helps, Thanks for reading and enjoy the article.

Wednesday 31 August 2011

Does Tack Clothing a wood floor make any difference??

Hello and welcome to another Woodfloor-Renovations Blog post.

In Today's post I'll be touching on a subject that even alot of professional firms don't include in their wood floor preparations, today's question....and its from me to be honest with you,
 is..."Does tack Clothing a Wood Floor make any difference ?"  

The short answer is "Yes" it does make a difference.....a big, big difference.... now let me explain why.

Tack Clothing a floor is the absolute final part of the floor sanding process before the Seal/Oil/Lacquer is applied to the freshly prepared wood floor.

The cleaner the floor is before the seals are applied the better the finished product, the happier the clients.....quite a simple equation really. When we hoover our floors for the final time, and believe me when I say our Vacuums/Hoovers are very powerful, they pick up virtually all the dust left over from the final sanding process.

You can run your hand over the floor prior to tack clothing and it will feel lovely and smooth and you will be hard pressed to find any dust or debris with your hand.The Tack Clothing process cleans away the very fine dust that you can't see but is there, it really does make a difference folks...

if you are a professional  reading this and are thinking...Ppaaahhhh I don't need to do that...check out the pictures below...As someone said a long long time ago...a picture speaks a thousand words...

The pictures were taken directly before and after tack clothing a small [10m2] Study which had Teak Parquet Block Flooring. Let me know what you think.


A 20 Pence Tack Cloth 'Before'

And 'After' ...It does make a difference

Thanks for reading.


Wednesday 24 August 2011

Gouges in my Oak Floor...Will they Sand Out ??

Hello and welcome to another Woodfloor-Renovations Blog Post.


Today's topic isn't something I get asked alot to be quite honest, usually 4-5 times a year at most, but if it happens to you then its good to perhaps have some solid answers.

The question is "I've got gouges in my Oak Floor, Will they Sand out ??"

I did a Floor Sanding job a few days ago for some clients who had an issue with their oak strip floor, a company had delivered a large 'American Style' fridge freezer, but when it was in transit along the Hallway it unfortunately fell off the trolley and put several bad gouges/scratches into a small area.

The gouges in the wood floor were approx 1mm deep and although it took some time to detail sand out the marks, the finished floor looked excellent, and when we called the client back into the area to see what we had done to the gouges...she couldn't find the area, we had to point out where they were, there was one very small mark which didn't sand out but it really was minuscule and the client couldn't find that either, so all in all it was a good result.


The pictures underneath detail the gradual disappearance of the marks during the sanding process, and the last picture is a wider shot of the Hallway after the last coat of Lacquer Had been applied.

Sometimes no matter how hard you try, some marks just will not sand out of wooden floors. In our case the floor we sanded was Solid Oak which hadn't been Sanded before, so we knew we had alot of wear layer to play with, and that the damage was a fairly recent event, so the odds were in our favour.

If you have a similar issue/problem with your floor I would strongly advise to consult a professional as to the best course of action for you, also don't be fobbed off by your insurance company, our clients had been offered a derisory amount to settle, but as the floor ran into another room they were well within their right to ask for both areas to be put right...Answer to the question...yes in this case the marks sanded out....sometimes they do, sometimes they don't...but it won't be for the lack of trying.

Hope this helps you in some way...Thanks for reading.


You can plainly see the gouges and scratches....

After a few passes with the Bona 10" Sander the marks are diminishing....

The marks are gone....the floor is now prepared and ready for lacquer

All done and completely finished....with a very happy client...


Sunday 21 August 2011

Bona Novia...Is it any Good ??

Hello and welcome to another Woodfloor-Renovations Blog Post.

This post is about an enquiry I received a few weeks ago, the person was wondering because this product was at the cheaper end of the flooring lacquer scale that it may not be up to much.

The direct enquiry was "Bona Novia...Is it any good ??" 

The quick answer to this question is YES, it is a good product, in my humble opinion a VERY good product.

Bona Novia is positioned at the 'Budget Sensitive' end of the market, or in easy to understand language the cheaper end, just because the product is relatively cheap by comparison doesn't mean it isn't any good, quite the opposite really.

Novia is from the mighty Bona stable, a Swedish company renowned for it's high quality products for several decades.

I can speak with a little authority on this because in October 2008 I was invited, along with around 25 other Wood Flooring professionals from the UK on a 2 day visit to the Bona HQ in Sweden...

At this time Bona Novia was just about to come to the market, and we were lucky enough to be given a tour of the Bona laboratory where all the formulations are made. It gave us all a fantastic insight into the thoroughness and incredible amount of work that goes into producing a wood flooring lacquer like Bona Novia.

Now I might just be a little biased when it comes to Bona Novia, but after seeing first hand what goes into that product that's hardly surprising news...

I personally have used Bona Novia on many many projects and have nothing but high praise for the product, from a professional perspective its very easy to apply to wooden floors, looks fantastic and has good wear characteristics and given its relatively low price point its good news for the end user of this product.

I have written a more comprehensive product review of Bona Novia which is available for viewing at the Woodfloor-Renovations Website

Hope this helps - Thanks for reading


Wood Floor Withering ??

Hello and Welcome to another Woodfloor-Renovations Blog Post.


Firstly i'd like to apologise to our regular readers for our lack of blogs over the last couple of weeks, we genuinely been very busy on two quite large scale [and difficult] projects for one of our regular corporate clients.

These are now finished so there will be more regular updates.

A few weeks ago a Mr TM Cleverley posted a question which I have yet to answer, so here goes....."My Wooden floor gets withered with time, I am considering to repair it but don't have any idea what and how much it takes"

In my experience when a wood floor starts to look/feel withered this is usually associated with very dry and warm site conditions...EG. Central Heating turned on too high over long periods of time combined with low humidity levels, or more commonly the Sun shining in through windows/large double doors with no vertical blinds, directly onto the surface of the wood floor, literally cooking it...Also when underfloor heating is turned up too high over long time-frames, this can have the same same detrimental withering effect on solid wood flooring.

Repairing a floor which has withered can be a difficult process and normally involves increasing the humidity levels in the effected area, this is a process which is best left to experienced professionals to undertake, this is not an area of my specific expertise so I will not be going into any more detail on this.

Mr Cleverley didn't mention what part of the world he lives in, so its difficult to quantify costs, but I would recommend contacting a reputable tradesman or Company in your specific area to properly ascertain any issues you have with your wood floor, the likelihood is even if the tradesman is not 100% sure what your issues are he will know someone in the trade who will.

Hope this helps...Thanks for reading. 

Monday 15 August 2011

Will the black marks on my parquet floor sand out ?

Hello and welcome to another Woodfloor-Renovations Blog Post.

Today the question asked is one which we come across quite alot, and can affect many different types of wood floors in many different ways.

The question is "Will the black marks i've got on my parquet floor sand out ??"

In this particular case the black marks are made by a cat litter tray...the floor in question is a Rustic Oak Parquet block floor, and you've guessed it ... the marks are pretty bad.

In this case the black marks on the parquet blocks didn't sand out, we did try very hard and used quite harsh abrasives [24 grit] to try and remove the said marks, unfortunately in this case circumstances dictated that the marks could not be removed...i'll explain why.

The Rustic Oak floor in this case had an Oiled finish, which had been in place for at least four years and wasn't applied particularly well in the first place, the cat litter tray for whatever reason had small holes in the bottom [like a plant tray] and let out the combination of cat urine and the litter mixture gradually over a long period of time.

When a mixture like this settles and permeates into an Oiled floor there is only going to be one result and that is a nasty black mark that just cannot be sanded out, the only other option would be to take out and replace [with new blocks] the effected area.

 In our scenario the clients understood the issues and as the area was out of the main living space they decided to live with it and buy a better cat litter tray...

Hope that helps - thanks for reading.

Wednesday 10 August 2011

What Do I Use To apply Hardwax Oil to my Sanded Wood Floor?

  Hello and Welcome to another Woodfloor-Renovations Blog Post.   Today I'll be briefly chatting about a subject many Diy-ers often get badly wrong, often leaving their finished project not looking as good as they had hoped. Todays question is  "What Do I Use To Apply Hardwax Oil To my Sanded Wood Floor? "   There are various methods for the application of a Hardwax Oil to a Wood Floor, wide paint brush [specialist from supplier] short pile roller [5mm pile length] or the professionals favourite the 'Double Blade Scraper' which is our preferred method of Hardwax Oil application. With the Double Blade Scraper method you literally spread the Oil around your floor using this type of scraper, you are best trying out the method on a small area before committing yourself to a large room or area.   When you start applying the HWO [Hardwax Oil] I find it is best doing across the width of the room and out about 1 metre, so you can either use a buffing machine with a lint free Oil cloth to buff off, or wipe off the excess HWO you have just applied, [make sure you can reach and use a lint free cloth] Once you have done this once or twice you will pretty much get the hang of it, the trick with applying just about every type of Wood Flooring Oil is to apply it VERY thinly indeed and then wipe off all the excess straight away. Some of the thinner Oils such as Junckers Rustic Oil are very good for the Oil to be applied with a short pile roller, again remember that Oil does go a long way, and to wipe off any excess product, drips etc, as Oil has no self levelling properties so whats left on the floor will stay on the floor......just something to keep in mind.   The thicker formulations of Oil such as Osmo or Saicos hardwax oils, are not as easy to be using a short pile roller on, these products are generally better suited to be applied using a Double Bladed Scraper. This is why the application rates for Oil are much greater than for Lacquer, with a generic HWO, for examples sake Osmo, with the Double Blade Scraper method you should easily get a coverage rate of 25m2 per litre of product, another benefit of this application method is the drying time, you should be able to apply the second and last coat of HWO  approx 2 hours after the first application.  We recently refurbished a Oak floor for one of our regular clients, and she supplies the HWO product for us to apply, in this case Saicos, the finished floor is in the video we recorded of this finished job which you can view near the top of this page.  Hope this Helps...Thanks for reading.... *NB* If a Mr T Cleverly is reading this then accept my apologies for not replying sooner to your question you recently posted, we have been very busy on the first part of a large 300m2 + Sand and Refinishing project for a local Council....I will reply to your question in my next post. Regards Gary