Showing posts with label floor seals. Show all posts

Saturday, 24 September 2011

Parquet Wood Block Flooring Repairs To an Old Hearth Area

Hello again and welcome to another Woodfloor-Renovations Blog Post.


Today's wise words are not from anyone sending in questions or asking for professional advice, but are initiated from a recently completed project.


The project was relatively small in size, but the parquet block repairs we carried out to the voided fireplace/hearth area made a huge aesthetic difference to the room, and most importantly made our client very happy indeed.

In my experience there are two main ways to in-fill a voided hearth area with parquet blocks, the easiest and somewhat quicker method would be to do the in-fill with what I personally call 'soldier fashion' this method involves properly preparing the sub-floor and then laying the blocks in soldier like rows and using the correct parquet adhesive to fix the parquet blocks into position. [see picture below]


Parquet Block Flooring Repair

The other method I use is a one I call the 'Tied In' method, Its certainly more work and is considerably more time consuming than the 'Soldier Fashion' method, but if done properly the repair will barely be noticeable in any room in which it is done.

The DIY enthusiast MUST  bear in mind that when trying to effect the 'Tied In' repair method, it is very important that the replacement blocks that are being used for the repair are as best a match as possible to the block species and even more importantly the block size dimensions.

I can hear you saying...'what difference will a few millimetres make??'

The answer is an awful lot of gap filling and more work for the end user...trust me I've been there...done that...If you have spare material in your property perhaps in a cupboard or under-stair area it is much better to use material of the same species and dimensions than trying to find reclaimed materials to match.

The following pictures are from a project I have completed and shows clearly the difference between the two methods, with the 'Tied In' method there is more initial preparation work, given the fact that you have to remove maybe 2 dozen or more full blocks and many smaller angle cut blocks so the pattern can be tied back in properly.

In the picture below you can see where the old hearth was, and also where the original 2 block border was, I used nearly all these border blocks to infill the voided area.


Beech Paquet Block Repair to Hearth Area


The next picture shows the area after the infill has been done, the area looks a little gappy, but this is nothing to worry about and is completely normal for repairs of this kind. The area was gap filled after the floor sanding had taken place.

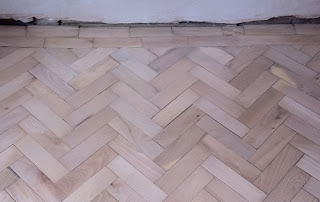
Beech Parquet Block Floor Repairs

The room was left for a few days for the repair to fully go off, the whole room was fully sanded off and properly prepared, the repaired area was then gap filled, sanded off again, and the room then sealed and lacquered in this case with Junckers Semi Gloss Lacquer. See the picture below for the repair is done,finished and pictured just before the first coat of seal was applied.

Beech Parquet Floor Repairs in Cheshire

The finished floor in this instance really did look superb and the clients were very hard pressed to find where the repair was...I have uploaded the Gallery pictures of this project to our website, you can view the photo set Here

Thanks for reading...Hope you enjoyed...


Wednesday, 31 August 2011

Does Tack Clothing a wood floor make any difference??

Hello and welcome to another Woodfloor-Renovations Blog post.

In Today's post I'll be touching on a subject that even alot of professional firms don't include in their wood floor preparations, today's question....and its from me to be honest with you,
 is..."Does tack Clothing a Wood Floor make any difference ?"  

The short answer is "Yes" it does make a difference.....a big, big difference.... now let me explain why.

Tack Clothing a floor is the absolute final part of the floor sanding process before the Seal/Oil/Lacquer is applied to the freshly prepared wood floor.

The cleaner the floor is before the seals are applied the better the finished product, the happier the clients.....quite a simple equation really. When we hoover our floors for the final time, and believe me when I say our Vacuums/Hoovers are very powerful, they pick up virtually all the dust left over from the final sanding process.

You can run your hand over the floor prior to tack clothing and it will feel lovely and smooth and you will be hard pressed to find any dust or debris with your hand.The Tack Clothing process cleans away the very fine dust that you can't see but is there, it really does make a difference folks...

if you are a professional  reading this and are thinking...Ppaaahhhh I don't need to do that...check out the pictures below...As someone said a long long time ago...a picture speaks a thousand words...

The pictures were taken directly before and after tack clothing a small [10m2] Study which had Teak Parquet Block Flooring. Let me know what you think.


A 20 Pence Tack Cloth 'Before'

And 'After' ...It does make a difference

Thanks for reading.


Sunday, 21 August 2011

Bona Novia...Is it any Good ??

Hello and welcome to another Woodfloor-Renovations Blog Post.

This post is about an enquiry I received a few weeks ago, the person was wondering because this product was at the cheaper end of the flooring lacquer scale that it may not be up to much.

The direct enquiry was "Bona Novia...Is it any good ??" 

The quick answer to this question is YES, it is a good product, in my humble opinion a VERY good product.

Bona Novia is positioned at the 'Budget Sensitive' end of the market, or in easy to understand language the cheaper end, just because the product is relatively cheap by comparison doesn't mean it isn't any good, quite the opposite really.

Novia is from the mighty Bona stable, a Swedish company renowned for it's high quality products for several decades.

I can speak with a little authority on this because in October 2008 I was invited, along with around 25 other Wood Flooring professionals from the UK on a 2 day visit to the Bona HQ in Sweden...

At this time Bona Novia was just about to come to the market, and we were lucky enough to be given a tour of the Bona laboratory where all the formulations are made. It gave us all a fantastic insight into the thoroughness and incredible amount of work that goes into producing a wood flooring lacquer like Bona Novia.

Now I might just be a little biased when it comes to Bona Novia, but after seeing first hand what goes into that product that's hardly surprising news...

I personally have used Bona Novia on many many projects and have nothing but high praise for the product, from a professional perspective its very easy to apply to wooden floors, looks fantastic and has good wear characteristics and given its relatively low price point its good news for the end user of this product.

I have written a more comprehensive product review of Bona Novia which is available for viewing at the Woodfloor-Renovations Website

Hope this helps - Thanks for reading


Saturday, 30 July 2011

Lacquer Sheen Level....Can I Change Between Coats?

Hello and Welcome to another WFR Blog Post.


Today's question isn't something that I get asked too often, but its a fairly straightforward answer so we'll go with the flow.

The question is "Can I Change the Sheen level of the Lacquer Between Coats ?"

Short answer is YES, but there are of course some proviso's.....In this instance our DIYer has applied 2 coats of Junckers Strong Gloss lacquer onto his Maple Strip flooring and has decided its too shiny.

What I have recommended he do is as follows.....The floor surface in the room will need to be 'Cut Back' which in layman's terms is a light abrading of the lacquer surface, with say a 120 or 150 grit level sanding screen or abrasive, this 'Keys' the surface of the lacquer in readiness to accept the following coats of seal. Then obviously vacuum the surface thoroughly and then tack cloth to remove any fine particles of dust and debris.


You are now ready to apply the next coat of lacquer, in our friends case he was going to use Junckers Strong Matt finish, You really must use products from the same manufacturer when you are applying a different sheen level, they are basically the same products with different levels of matting agents in them, so the chances of the intercoat adhesion failing is remote if the correct procedures are carried out.

Its also not a bad idea to use a new roller to apply the next coat of seal, either that or make sure that the roller or applicator you used to apply the previous coats has been properly washed out.

Hope that helps....Thanks for Reading.

Saturday, 16 July 2011

Floor Lacquer Sheen level....Which one should I choose ?

Hello and Welcome to another WFR Blog Post.


Today's wise words are all about one of the fundamental choices clients need to make at the initial contractor site visit stage of the Wood Floor Sanding and Sealing process.


The question being "What lacquer sheen level should I choose ?"  


There really is no textbook answer here, every client has slightly different needs and their project is a little different to everyone else's project....Some people like a very flat Matt finish to their wood floors, some people like a satin or semi gloss finish, and a few people like a high gloss finish, bear in mind all the finishes will look great but its about choosing the look which will best suit the individual clients needs.


Semi Gloss or Satin [they are virtually both the same]  is the finish we apply most of, in percentage terms we will use approx 80% semi gloss, 10% matt or ultra matt and around 10% gloss on our projects, semi gloss is not too shiny nor too flat and is the ideal finish for many clients.


Ultra Matt is becoming increasingly popular, the sheen level of this product is around 9% so it is very matt in appearance and if you didn't know any better you would think it's an oiled finish...but you have the ease of maintainance of a lacquer and the aesthetic appearance of Oil, it's win-win for many clients these days.


Gloss finishes aren't for everyone here in the UK, but in the US gloss finishes are huge and most refinished wood floors will have a Gloss finish. Up until a couple of years ago I didn't really like Gloss, but I did a project where the client specified a high gloss finish and the finished article looked absolutely tremendous....so I changed my mind.


In summary I would advise doing your homework before you specify a lacquered finish with your contractor, ask to see some of your contractors finished projects via a portfolio or on their website, or ask them to do a small test area for you so you can see for yourself how a particular sheen level will work in your particular environment, don't be afraid to ask.....if they want your business chances are they will do it for you without any problem.


hope this helps......Thanks for reading.


We have multiple wood floor sanding galleries on our website with many different species of wood and lacquer finishes available for you to peruse.....check us out :-)


Friday, 8 July 2011

Junckers Ultra Matt Flooring Lacquer.....Before and After Pictures

Hello and Welcome to another WFR Blog post.


Today I'm going to do a 'Show & Tell' blog, that is to show you the pictures from a recently completed project, and to tell you how good the finished article looked.


The seal system we used on this project was 1 x Coat of Junckers base Prime followed by 2 x Coats of Junckers Pro Finish Ultra Matt.


We have used Junckers Pro Finish Ultra Matt lacquer quite a few times before, but for some reason the product looked just fantastic when it was applied to the Oak Strip floor we completed for one of our regular clients this week.


 Wendy [our client] was over the moon with the finished floor, it did look really good i must say, i know i may be slightly biased but come on....how good do the pictures look....Whats that old saying......... 'A picture speaks a thousand words'


I shall say no more on this one....enjoy the pictures.....let me know what you think.


Saturday, 2 July 2011

Floor Lacquer Sheen Levels....Whats the Difference ??

Hello and welcome to another WFR Blogpost.


Today I'll enlighten you on a question that confuses most of my clients who just don't understand the difference....


The direct question I was asked is:-"What's the difference between Bona Mega Matt & Bona Mega Silk Matt ?? "


The trade terminology for this is "Sheen Level" ie. the difference between Matt & Silk Matt products. What this basically means in how much light the product reflects when applied to your wooden floor, typically a Matt product will reflect around 20% of the sunlight that hits it, Silk Matt or Satin reflect between 40-60% depending on the manufacturer, and Gloss reflects about 80%.


Ultra Matt is a finish which is becoming more and more popular these days and just about all the top manufacturers have these products in their ranges, Ultra Matt Lacquers have a very low sheen level which by comparison to Matt/Silk Matt/Gloss, this would be around the 9% mark.


At the end of the day choosing which sheen level to go for is a subjective issue and needs to be made by the home-owner before the project starts, what I will say is around 80% of my clients choose Silk Matt/Semi Gloss [which are the same] most of them say they don't want the finish to be too shiny or too flat/dull, so they plump for the Silk Matt which ALWAYS looks good by the way....All the finishes look good but its all about personal preference....


If you are not sure, ask your contractor to sand off a small area of your floor for you prior to the project starting and apply a quick couple of coats of the lacquer, so you can see for yourself how the sheen level will look on your particular floor, a good contractor won't mind doing this for you as it doesn't take long to do......


Hope that helps.....Thanks for reading.