Monday 26 September 2011

Flooring Lacquer Application....Shall I Use a Roller or T Bar Applicator

Hello and Welcome to another Woodfloor-Renovations Blog Post


Today I'll try and advise on an issue that can effect if the final touches to your hard work will look any good or not...Yes its the contentious issue of Lacquer application...Do you use a standard Roller...or a more professional 'T' Bar applicator. 


When I first started floor sanding, I was shown by a very experienced floor sanding operator how to use a 'T' Bar applicator, and boy did he make it look easy, in the hands of an experienced pro it looks simplicity itself to put lacquer down correctly...Pahhhhh I thought, what's all the fuss about, its easy - I can do that.


Now I can do it easily, but it took many months before I became accomplished with the Padco Bigfoot, its nowhere near as easy as it looks.


The image on the left is the Padco Bigfoot floor lacquer applicator, the operator is applying lacquer, likely to a large area. The Padco Bigfoot and applicators of its type are just superb for putting lacquer down to large area's, I myself have used this applicator scores of times with nothing but a top class result, in the hands of a professional its possible to get a near flawless finish to large area's pretty quickly.


However, I really wouldn't recommend this applicator for the very occasional DIYer, who is just using it for one or two rooms. The Padco is not at its best in small area's, for a professional its straightforward, but for the inexperienced user this tool will be difficult to use properly, to obtain a high quality of finish to your project.


For an end user who hasn't much [or no] experience I would highly recommend using a roller for applying the lacquers to your wood floor. Once you have the floor correctly prepared and readied, use a 4" foam roller to cut in, and either a 9" or 12" roller and cage for the main lacquer application duties.


The image on the right is a 9" roller and is obviously being used to correctly apply a lacquer product to a wooden floor, in this case a mosaic parquet. For just about all the Sand & Seal jobs I do these days I tend to use a roller, as I find the overall finish that you get, especially in smaller areas is just much better than using a Padco Bigfoot.


We tend to use either a 15" or 18" version of the image to the right. Whichever size roller you use make sure that the pile length is around the 8mm mark, this is pretty much the optimum roller sleeve pile length for applying lacquer to a wooden floor, if the pile is say 13mm, the roller has a tendency to 'splatter' the lacquer over the surface and it just takes a lot longer to apply the product [lacquer] correctly to the floor.


If you use a short pile length roller of around 5mm the roller tends to flood easily and again it takes alot longer to apply the lacquer correctly, many manufacturers supply and recommend their own rollers and roller sleeves, if you are not confident about sourcing the correct roller/sleeve products then I would heartily recommend purchasing the manufacturers own branded roller/sleeve as you are much more likely to get a better finish, especially if you do your homework in the first place, most manufacturers have this type of information on their respective websites.


Plus there is You Tube, which is a veritable gold mine of information on this subject. Type in 'apply bona mega' as an example and you will quickly find dozens of videos showing how to apply flooring lacquer.


Hope that helps, Thanks for reading.


I have recently received an email from JD Floors asking for some advice on how to fix an Alto Floorcrafter, which is cutting too hard to the left, Unfortunately I have no experience whatsoever of this machine, but I did do a quick Google search and it looks a quality piece of kit.


 I myself use Bona floor sanding machinery, Bona have an excellent instructional video which may be of help, as most professional floor sanding machines are built to very similar principles so the clip may just be of use, follow the link below.


Bona Instructional Video 


Saturday 24 September 2011

Parquet Wood Block Flooring Repairs To an Old Hearth Area

Hello again and welcome to another Woodfloor-Renovations Blog Post.


Today's wise words are not from anyone sending in questions or asking for professional advice, but are initiated from a recently completed project.


The project was relatively small in size, but the parquet block repairs we carried out to the voided fireplace/hearth area made a huge aesthetic difference to the room, and most importantly made our client very happy indeed.

In my experience there are two main ways to in-fill a voided hearth area with parquet blocks, the easiest and somewhat quicker method would be to do the in-fill with what I personally call 'soldier fashion' this method involves properly preparing the sub-floor and then laying the blocks in soldier like rows and using the correct parquet adhesive to fix the parquet blocks into position. [see picture below]


Parquet Block Flooring Repair

The other method I use is a one I call the 'Tied In' method, Its certainly more work and is considerably more time consuming than the 'Soldier Fashion' method, but if done properly the repair will barely be noticeable in any room in which it is done.

The DIY enthusiast MUST  bear in mind that when trying to effect the 'Tied In' repair method, it is very important that the replacement blocks that are being used for the repair are as best a match as possible to the block species and even more importantly the block size dimensions.

I can hear you saying...'what difference will a few millimetres make??'

The answer is an awful lot of gap filling and more work for the end user...trust me I've been there...done that...If you have spare material in your property perhaps in a cupboard or under-stair area it is much better to use material of the same species and dimensions than trying to find reclaimed materials to match.

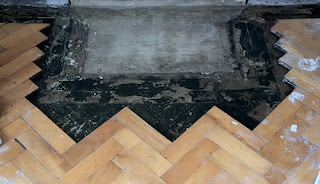
The following pictures are from a project I have completed and shows clearly the difference between the two methods, with the 'Tied In' method there is more initial preparation work, given the fact that you have to remove maybe 2 dozen or more full blocks and many smaller angle cut blocks so the pattern can be tied back in properly.

In the picture below you can see where the old hearth was, and also where the original 2 block border was, I used nearly all these border blocks to infill the voided area.


Beech Paquet Block Repair to Hearth Area


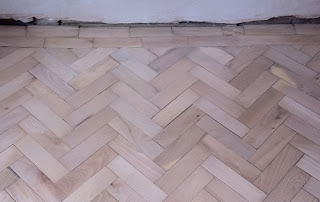
The next picture shows the area after the infill has been done, the area looks a little gappy, but this is nothing to worry about and is completely normal for repairs of this kind. The area was gap filled after the floor sanding had taken place.

Beech Parquet Block Floor Repairs

The room was left for a few days for the repair to fully go off, the whole room was fully sanded off and properly prepared, the repaired area was then gap filled, sanded off again, and the room then sealed and lacquered in this case with Junckers Semi Gloss Lacquer. See the picture below for the repair is done,finished and pictured just before the first coat of seal was applied.

Beech Parquet Floor Repairs in Cheshire

The finished floor in this instance really did look superb and the clients were very hard pressed to find where the repair was...I have uploaded the Gallery pictures of this project to our website, you can view the photo set Here

Thanks for reading...Hope you enjoyed...


Sunday 18 September 2011

Floor Lacquer Systems...What are they?

Hello and welcome to another Woodfloor-Renovations Blog Post


Today I'd like to talk about about a subject that is oft ignored, even by many pro's, today's offering is:
 'Floor Lacquer Systems... What are they ??'


A floor lacquer system is the correct application of the proper primer coat and subsequent coats of either lacquer or oil.


Now dependant on some of the many variables involved with the floor sanding and sealing process, such as floor species, desired finish [sheen level] site conditions, time-frame, etc. etc. [the list is long] certain primers are more suitable than others for certain timbers and certain finishes.


For example, if the end user has properly prepared a Beech strip floor and wants a deep rich natural colourization of the timber, then an Oil based primer may be the ideal primer to use, but using this primer may not be practical if the job needs to be completed in a day as oil based primers have much longer drying times [6-8hrs in some cases]


Now if the same floor HAS to be done in a day then you can use a solvent based primer such as Junckers Baseprime, or Blanchon Fond Du, these types of primers almost give the same kind of depth of colour to the timber but dry in about an hour, so very often, a capable professional can apply 1 x coat of primer and 2 x coats of lacquer in around 3-4 hrs in reasonable site drying conditions.


So you have now applied your primer coat, the wood floor looks great, now's the time to apply the lacquer to finish off the system, for examples sake again lets say this project is a domestic situation and the space is a busy living area belonging to a busy family. If this imaginary project was for one of my clients I would have recommended 1 x Primer Coat followed by 2 x High Traffic Lacquer, or maybe even 3 x High Traffic Lacquer.


With wood floor lacquer systems its about horses for courses, some situations demand a harder wearing finish which will cost a bit more initially, but will be more cost effective in the longer term as it will just wear better than a more standard lacquer finish.


Conversely the clients may have a low traffic environment and not need the high traffic finish, in which case a mid range product such as Bona Mega or Junckers Strong would be eminently suitable. 


In reality its up to the end user to decide whether a 3 coat or 4 coat system best suits their particular needs, if you are in any doubt ask your floor sanding professional.


Hope that helps - Thanks for reading

Friday 16 September 2011

I'm Sanding a Wood Floor Myself, What advice would you give me ??

Hello and welcome to another Woodfloor-Renovations Blog Post.


Firstly I'd like to apologise for the lack of output from myself the last couple of weeks.....we've been pretty busy pushing and pulling the sanding machine and time has been at a premium.


Today I'll expand on a subject that many people try and do, but few do really well, the question [via email] is: "I'm sanding my wood floor myself, what advice would you give me ??"


The wood floor in the picture was sent in by our man asking the question, the species is also unknown to him and is apparently original to the property and looking a bit on the rough side I must say - I would hazard a guess at either Maple or Beech as the species [actual picture below]


This wood floor could be one of half a dozen or more different species, the orange 'glow' will be thanks to a seal called Bourneseal, which was commonly used back in the day - but any wooden floor it touched would end up this orange colour - avoid at all costs.

The worst mistake the average DIY floor sander makes is hiring poor quality sanding machinery, and by that I mean most of the hire shop fleet of HT7 and HT8 machines. These machines have precious little in the way of dust capture and are an absolute country mile away from the standard of Professional floor sanding kit.

If you are serious about doing the best job you can on your wood floors, then hire the better quality machinery which is available at many outlets nationwide [UK] it of course costs a bit more than the standard hire shop fodder but if done properly the results will speak for them selves.

 The minimum machinery level I would suggest you will need are as follows, [IMHO] if your budget can stretch to the professional kit, then try and hire either a Bona 10" Sanding Machine as the main sander, or the Lagler Hummel. 

These two beasts are arguably the best two sanding machines in the business, I personally have used both of them on several large scale projects, and as i run a nearly new Bona 10" sander on a day to day basis I would have to say its the better machine, but its close, the Hummel is a superb bit of kit also and can tackle the hardest of jobs with aplomb.

You will also need a good quality edging machine, both Bona and Lagler have these machines in their respective armoury's, both will do the job really well, if you have multiple rooms I would suggest hiring the 7" version as it is just more powerful and a little bit quicker than its 6" sibling.

Next on the list is the Buffing/Finishing machine, this is used to put the final smoothness to the floor, it is usually the last 2 or 3 processes that put the most quality into the job. Bona have an excellent buffing machine, cunningly called the 'Bona Buffer' its pretty easy to use and does a great job.

Lagler have arguably the best finishing machine in the business, the Trio - this is a superb machine and can put a world class finish on most floors, although Parquet floors are its forte its also tremendous on just about every Hardwood floor out there. The Trio is an expensive piece of kit and is consequently not cheap to hire, but you will get a superbly smooth finish to your wood floor if used correctly.

Many companies here in the UK that hire the professional standard equipment, will hire out the equipment individually or in a package form, where you can hire the relevant equipment that best suits your particular needs, if you tell these companies what type of floor you have, the size of the area and your time-frame and budget, they will give you the best advise they can I'm sure. 

Anyone contemplating sanding a floor themselves must be prepared to do their homework...and then some...Sanding a wood floor properly and getting a professional finish is not easy, and for someone with no experience or know-how the chances of getting a high quality finish on your floors are slim...even with professional kit...but, and its a big but, if you research the subject in depth, take your time and hire the best machinery you can afford you will give yourself a fighting chance.

Hope that helps - thanks for reading.  


Saturday 3 September 2011

How Do I Lay Parquet Flooring Adhesive ?


Hello and welcome to another Woodfloor-Renovations Blog Post.

Today I'll talk a little about a rather sticky subject [excuse the pun] which most people attempting to use professional Parquet Flooring Adhesives for the first time may be in for a bit of a shock.
The question today is "How do I lay parquet flooring adhesive ??"

For the first time amateur DIYer its just not as easy as you think, just about all good quality parquet flooring adhesives are incredibly sticky and have an annoying habit of going everywhere.

ALWAYS use vinyl/plastic gloves because if you don't the glue takes some removing from your hands.

The adhesives we use regularly are Lecol 5500, Laybond L16 and Sika 5500s.

These are all excellent products and all basically do the same thing, which in this case is to properly stick Wooden Parquet Blocks to a subfloor.

We did a comprehensive article on this very subject a few months ago which goes into detail about the products, methods and the tools needed to get the best result possible for your project. Have a look at our Parquet Flooring Repair Tips and Hints page.

Hope this helps, Thanks for reading and enjoy the article.